


Want to create interactive content? It’s easy in Genially!
Pattern Brushes
Julia Zieger
Created on October 4, 2022
Start designing with a free template
Discover more than 1500 professional designs like these:
Transcript
Tool Settings
Download the Brush Tip for the Dual Brush by clicking on it
Natalias Website
Download Pattern
Download Pattern
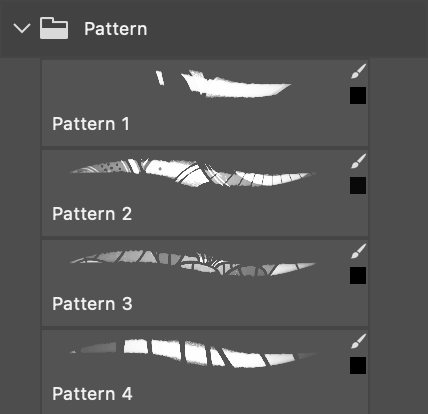
These beautiful patterns were designed by Illustrator, Designer and Artist Natalia Smirnova.
The Pattern Brushes can be applied flat like in a japanese wood block print. But if you want them to move around your shape, you can hit CMD+T to transform the shape and then ricght click and choose "Warp".
These Icons show you, that your Brush has been saved with the color and the tool Settings.
When saving your Brush, make sure to activate these Settings.
In your Tool Settings, make sure your Blend Mode is set to Normal, Opacity is set to 100 percent and Flow to 3 percent.Before you save the Brush, select black as your foreground color to include it into the brush.
Voila! Pattern Brushes!
Watch the Pattern Time Lapse
Load the Texture into your brush
After I turned the Texture into a seamless pattern, and saved it in my Photoshop Pattern Library, I was able to load it into my brush. Depending on the size of your file, you have to play with the scale of the texture. Most important is to set the Blend Mode to Darken, set the Control to Pen Pressure, and set the Minimum Depth to 100 percent. After this, you can play with the Brightness and Contrast until you have the texture that you like best.
Texture
Dual Brush
Shape Dynamics
Brush Tip
All Pattern Brushes have the same basic build. The Brush tip is a simple black circle, with the Spacing set to 1 percent. In the Shape Dynamics, the Control is set to Pen Pressure, so the size of the brush strokes can be controlled with the Pen. All four Brushes have a Dual Brush that defines the shape of the Brush Stroke. You can download the Brush Tip here. The Texture is different for each brush, depending on the pattern you want to use. You can download the patterns that I used for free at the bottom of this section.
Brush Settings "Ink"
Here you can see the pattern brushes applied to the Kimono
4 Pattern Brushes
The Pattern Brushes are supposed to look like kimono patterns and I want to apply them flat to the painting to simulate the look of an old traditional wood block printing. I found 4 beautiful patterns by illustrator Natalia Smirnova, that you can download and use for free. Let's take a look at the Brush settings!